
In the current climate the more visual stimulation to re-iterate the message of good social distancing practices the better to limit the spread of COVID-19. Markings need to be clear and concise. If the visuals do not make sense, rules will be broken as people will not understand what is being asked of them. The following methods can be used within any organisation for successful floor marking. Whether you are implementing 5S or not, floor marking will serve as an excellent tool to encourage social distancing and enhance best practise both with your employees and your customers.
Floor marking falls within the ‘Set in Order’ and ‘Sort’ phase of the 5S process. It is important to get input from the employees or customers on what they think will work while developing your Floor Marking plan. Some important features to take into consideration are as follows.
Colour
Floor marking colours need to be standardized; this falls into the Standardization phase of the 5S process. It will serve little to no purpose if different colours are being used to indicate different precautions and guidelines. There is no specific 5S colour scheme guidelines. Whatever colour scheme your organisation chooses; this should be adhered to rigidly throughout the floor marking process. A legend of the floor marking colours should be made available throughout the organisation, so that it can be understood, and it can be repeated. Below is a colour scheme we believe works well and has had proven success within organisations that have implemented 5S.

Materials
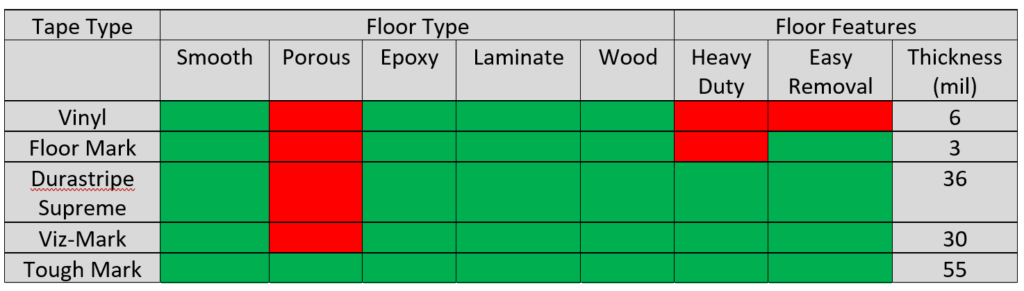
Again, a standardized 5S materials worksheet should be established by a team who are working on or using the floor area. This worksheet should be available throughout the organisation to ensure consistency. It is a good idea to implement a KANBAN programme to ensure that you never run out of 5S stock. Floor marking and 5S materials should always be available to your employees so that they can replenish damaged floor markers. Having this type of system empowers employees by getting them involved in the process. In the table below I have indicated the floor marking material which suits different types of flooring and the features of the floor marking material. Green areas indicate suitability while red indicates that it is not suitable.
Best Practices for applying Floor Marking
- Getting the tape to stick
If you are having difficulty in getting floor markers or tape to stick, often the problem is the wrong product was selected for the floor type. Please refer to Table 1 to ensure you select the right floor marking material for the floor type in your facility. The second problem relates to the tape or floor marking not been installed correctly. To get the tape or floor marker to stick correctly you must thoroughly clean the floor area first; it then must be dried and left to dry for a few hours after cleaning to ensure no moisture is left in the pores of the floor. Once the floor is clean and dry, excessive weight needs to be applied to the tape/floor marker in the direction it is being laid. If you do not follow these guidelines the tape will begin to lift at the edges within a matter of days.
- Straight lines
It is important to draw out the lines and areas that require floor markings first with chalk. This will give a good overall picture of what the area will look like prior to applying the permanent fixtures.
Apply the tape in about 60 to 70 cm lengths per time but keep the tape roll going (i.e. do not cut the tape in strips). By doing this you will be able to lift the tape from the roll and re-apply if you begin to go off track and you can then re-apply.
- Tape removal
There is nothing more confusing than having bits of old floor marking left on the floor. It is important if you need to remove floor markings, that they are removed in their entirety. The easiest way to do this is to use a floor scraper, which works extremely well when used correctly. Vinyl floor markings are very difficult to remove, and it is worth noting this before selecting this as a floor marking material. - Frequency of replacing floor markings
Floor markings, when applied correctly can last for a very long time and there is no requirement to replace them unless they become damaged and no longer serve their original purpose. Most tape materials can be cleaned easily and will come up as new once they are washed correctly.
Floor marking is a very successful tool for visual instructions in workplaces. By following the above guidelines, it may serve as a vital operational tool for re-opening business and slowing down the spread of COVID-19.